To raise monarch caterpillars at home, you’ll need a few supplies. There are some great commercial options for rearing monarch larvae. In this guide, you’ll learn the monarch butterfly supplies needed to raise from instar to adult butterfly.
But you don’t have to spend a lot of money to successfully do this. Many of the supplies can be easily made. Or even repurposed using recycled materials. You probably already have many of these supplies in your home.
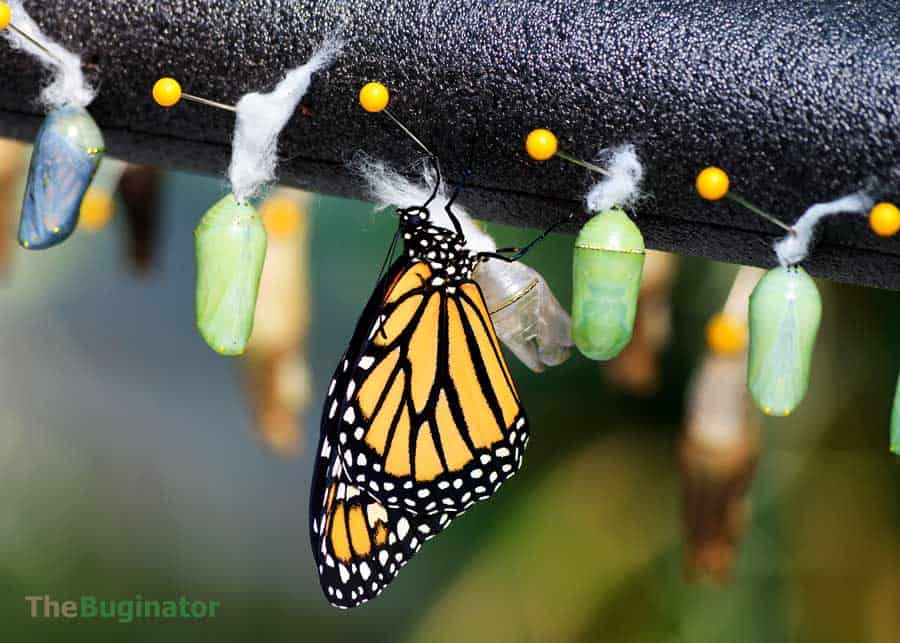
Table of Contents
14 Required Monarch Butterfly Supplies
Here are the tools of the trade – the basic supplies for raising monarch larvae at home.
- Rearing container (plastic food container or cardboard box)
- Clean paintbrush (2) one fine-tipped and wide-tipped brush
- Small bowl
- Plastic measuring cup
- Tissues or paper towels
- Round coffee filters or toilet tissue
- Clorox wipes
- Scissors
- Tweezers (optional)
- Tape (like packaging tape)
- Milkweed Plant
- Foam Pipe Insulation
- Push Pins
- Dental Floss
You can probably find many of these supplies around the home. If not, most are very inexpensive to pick up at the supermarket or department store. You can probably pick up most of these items for $40 or less.
Here’s more on how to use the tools when raising monarch butterflies.
Rearing Container / Monarch Habitat
This is the container where you’ll keep the larvae. There are nice commercial options available.
You can avoid purchasing an expensive habitat by reusing some plastic containers. Many have had success with reusable food containers (like Gladware or Ziploc brands). These will be great for the beginning stages of monarch development.
If you are using a well-sealed food container, create many air holes for circulation. These are required to prevent condensation. Moisture build-up is the enemy of successfully raising monarchs.
Always poke holes from the inside of the container. This keeps the rough edge (burrs) on the outside.
To create holes, use a narrow-diameter tool, like a needle or corkscrew. You can also use a small nail. Be careful not to make too big of a hole or else the newly hatched instars will be able to crawl right out. Remember that 1st instars are the size of small ants.
You can also use a shoe box as a rearing container. The loose-fitting lid is great for air circulation. And they are large enough to hold a large volume of air. You should still poke holes in the cardboard box.
Stage 2: Pupa and Butterfly: Once the pupa has hardened, you’ll need to move them to another area with more space. They will need space to hatch, spread their wings, and fly about.
Some popular options are $40 to $80 (or more). Here is a large (35 x 35 x 59 inches) monarch habitat. You can get a more basic option for under $20.
Paint Brushes
A small paintbrush is great for handling the newly hatched instars.
Because the caterpillars are so fragile, you need to avoid picking them up with your fingers as much as possible. The paintbrush is great because you can place it in the container and allow the instar to climb on it.
This method will protect it from unnecessary handling and subsequent damage.
Another method for moving the monarch larva is to simply lift the leaf that it is on. Depending on the leaf size and your dexterity, you can also use tweezers.
The larger paintbrush will serve as a small broom for cleaning out the caterpillar poop (frass). You can use the small bowl as a dustpan to put the frass and dry (wilted) leaves in.
Disinfectant Wipes
Clorox wipes (or a similar antibacterial cleaner) will help prevent unnecessary contamination of bacteria and viruses.
It’s a good idea to wipe all your tools with the Clorox wipe. Then rinse it with water. This disinfects the surface, then removes the chemical, so the monarchs aren’t affected either.
Milkweed Plant
In some areas, you’ll be able to purchase a potted milkweed plant. Some nurseries even grow them pesticide free for raising monarch caterpillars.
For more flexibility, you can order milkweed seeds online and grow the plant as required.
These milkweed seeds include six heirloom varieties and are untreated.
If you’re growing your own milkweed, you’ll want to keep an eye on milkweed bugs. They eat milkweed seeds and sap. They are also known to eat the aphids on the plant.
Paper Towel
To limit the mess at the bottom of the container, you can lay a layer or two of paper towels to collect the frass.
Then when you clean it each day, it will be faster and more thorough.
This guide is part of our Monarch Butterfly Guide.
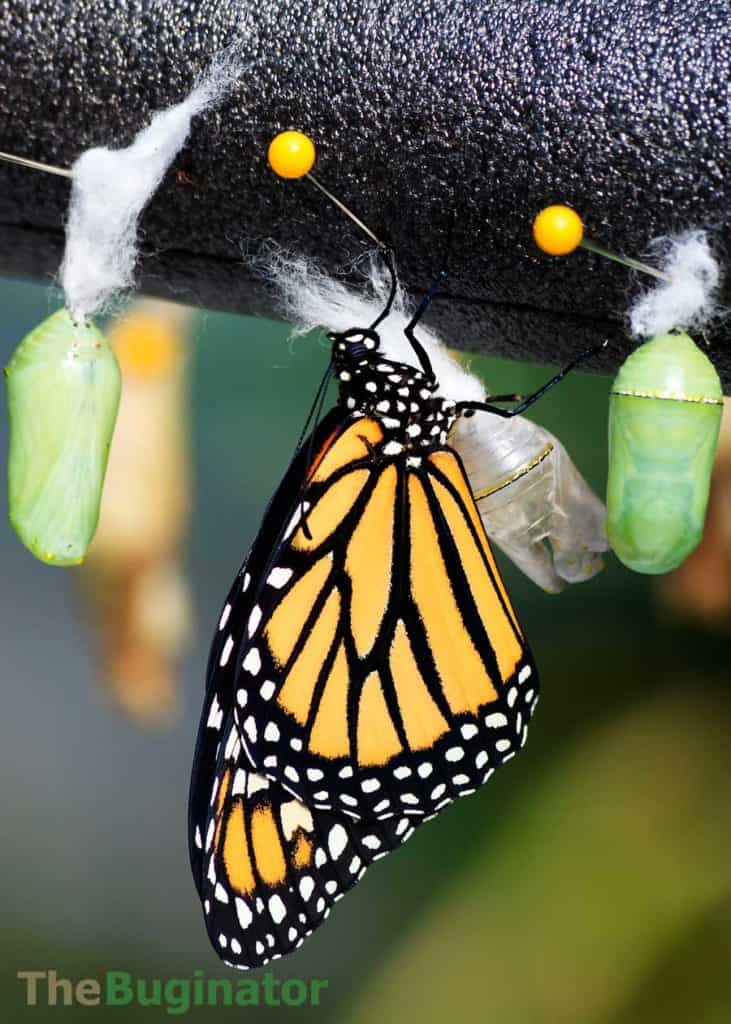
Foam Pipe Insulator and Push Pins
If you need to move the chrysalis, you can use a foam pipe insulator with push pins. This method is pictured above.
Raising Monarch Butterflies (Video)
Here’s a great look at what’s involved in raising monarch butterflies from the instar stage.
The video shows the collection of caterpillars, habitat setup, chrysalis, hatching, and release.
Your Turn
Have you raised monarch butterflies at home? How did it go for you? What monarch butterfly supplies did you use?
Please share your experience and tips in the comments.
- About the Author
- Latest Posts
Dena Haines is a founder and writer at My Monarch Guide. And is working to make it the best resource for raising and enjoying monarch butterflies.
She also blogs about travel at Storyteller.Travel and photography at Storyteller Tech. Dena is a partner at Storyteller Media, a publishing company she runs with her husband, Bryan.
Laurel Mancini
Monday 23rd of October 2023
Thank you. It is Sunday, 10.22.23 and I have had the joy of caring for a monarch caterpillar 10.9.23, seeing it move to its chrysalis stage 10.13.23, and then emerge as a butterfly 10.22.23. I checked a US national weather map, and though it is later than typical, I have hope that the female that emerged will migrate well. I have a second chrysalis which I found 10.20.23 and it is darkening and I can see the butterfly inside. I was unable to purchase a net cage so I improvised. Purchased cheesecloth, used two dowels and two slender branches, one with a nice horizontal piece. Stuck the dowels and branches in a pot of soil and carefully set the caterpillar, residing on a milkweed plant, inside and arranged the cloth around. The second monarch, as a chrysalis, I cut from its branch and stuck the branch in the soil. Today the weather was clear and warm. The pot went outside in a shady/ warm area. The butterfly emerged about 40 minutes later and the wings began to dry and it passed the fluid you mentioned in the article. The butterfly took about 4.5 hours and then flew off. The other chrysalis is still working. I expect it will emerge in the next day or so. Now that I have your articles, I can prepare much better for next year. Oh, I took care not to touch the caterpillar or butterfly. I snipped what they were on and moved it. Thank you again.